JTs StuIG 33B
+10
wds
CaptainJack
S P Hammerton
hmgroth
Pavel Zabák
Andy J
Andrew C
Jenny Ryan
G Cooper
John T
14 posters
Page 3 of 4
Page 3 of 4 •  1, 2, 3, 4
 Re: JTs StuIG 33B
It looks really good John.
I have the same kit in the stash, so I'm happy to have your "master class" set of assembly and painting instructions.
Looking forward to seeing more!
Cheers,
Bill
I have the same kit in the stash, so I'm happy to have your "master class" set of assembly and painting instructions.
Looking forward to seeing more!
Cheers,
Bill

wds- seasoned veteran

- Posts : 127
Join date : 2009-11-21 Location : San Francisco Bay Area, USA
 Re: JTs StuIG 33B
Yup!!Jenny Ryan wrote:PS Gary wanted to know if the airmoney for the airguitar is coming via airmail ?


 Thanks Jenny!
Hi Andy, a SBS is following
Hi Gary, you know the worn effects fluid and hairspray both have different pros and cons. The fluid is just poored into your airbrush and is easier to control especially for small or isolated areas, but its so much quicker and easier to grab a can of hairspray and give the whole model a quick spray. Each to his own but I would recommend experimenting first with which ever you choose. I've spent a fair bit of time practicing with the AK worn effects fluid, and now I have the technique fairly nailed down I stick to this fluid. I like to have maximum control too, so I prefer it.
Hi Bill, thanks for coming along for the build!
So here is what I did with the white wash. I airbrushed some clear overall first (something I should have done also before I chipped the panzergrey). Then I airbrushed light coats of the worn effects fluid. I like to thin it with 60/40 soapy water to fluid, but at this consistancy 8 light mist coats were needed.

Then quite a thin layer of Tamiya white, not too heavy. The balkenkreuz masked with blutack.

Chipped with a wet paint brush, starting carefully in case some areas had too much chipping fluid and came off completely.

I'm trying a bit of variation here, the assumption is that crew traffic on the roof has removed most of the WW, I thinking now I may remove more from the storage boxes.


Anyway that's how it stands presently. Thanks for looking
JT
John T- Platoon Commander

- Posts : 2767
Join date : 2010-11-09
Age : 60 Location : Townsville, Australia
 Re: JTs StuIG 33B
Cool! Thanks for sharing that JT, as you know I have a whitewash build in progress so this is very helpful.

Andy J- seasoned veteran

- Posts : 426
Join date : 2010-11-07
Age : 55 Location : Gunnislake, Cornwall
 Re: JTs StuIG 33B
Hi folks
I'm having fun with oil paints now, here are the colours. Deposited on a doubled piece of paper to absorb some oil.

This is my interpretation of Mike Rinaldi's Oil Paint Rendering technique. I say this because to my mind it's not one technique; it's using the oils for washes, filters, mapping, adding more chips or taking some away, streaks and stains and controlling virtually any aspect of the finish as desired.


These are in progress shots, more to do.
Cheers
JT
I'm having fun with oil paints now, here are the colours. Deposited on a doubled piece of paper to absorb some oil.

This is my interpretation of Mike Rinaldi's Oil Paint Rendering technique. I say this because to my mind it's not one technique; it's using the oils for washes, filters, mapping, adding more chips or taking some away, streaks and stains and controlling virtually any aspect of the finish as desired.


These are in progress shots, more to do.
Cheers
JT
John T- Platoon Commander

- Posts : 2767
Join date : 2010-11-09
Age : 60 Location : Townsville, Australia
 Looking great JT..
As always, The O.P.R. looks good. Dean

Dean Laughlin- seasoned veteran

- Posts : 145
Join date : 2009-01-04
Age : 57 Location : Mulwala. NSW
 Re: JTs StuIG 33B
Gday Dean thanks mate 
A few more progress shots, still mostly just oils.


Cheers
JT
A few more progress shots, still mostly just oils.


Cheers
JT
John T- Platoon Commander

- Posts : 2767
Join date : 2010-11-09
Age : 60 Location : Townsville, Australia
 Re: JTs StuIG 33B
Oh kewl work , I love how the jack looks like a seperate individual piece from the fender , it looks just like Simon said but by not requoting I do not need to put money in the swear jar  ! Looking forward to more .
Jenny
Jenny
 Re: JTs StuIG 33B
Thanks so much, that means a lot coming from you both!
After looking again at these pics I just think there's too much rust on this right side, so I used thinner to remove some oil paint.
We have a swear jar??? Oh c*@p I will be going #&*%ing broke!!!!
After looking again at these pics I just think there's too much rust on this right side, so I used thinner to remove some oil paint.
We have a swear jar??? Oh c*@p I will be going #&*%ing broke!!!!
John T- Platoon Commander

- Posts : 2767
Join date : 2010-11-09
Age : 60 Location : Townsville, Australia
 Re: JTs StuIG 33B
Hi folks, time for pigments! 


Cheers
JT


Cheers
JT
John T- Platoon Commander

- Posts : 2767
Join date : 2010-11-09
Age : 60 Location : Townsville, Australia
 Re: JTs StuIG 33B
Looks awesome John 
What did you use to make your mud?
Andrew
What did you use to make your mud?
Andrew
Andrew C- Be nice to me I am new

- Posts : 75
Join date : 2012-10-13
Age : 46 Location : Auckland, New Zealand
 Re: JTs StuIG 33B
Hi Andrew
Here's a SBS I did today:
A slurry of pigment and white spirit brushed on.

When dry the pigments were moved around and feathered out in places.


Fixer, not brushed on but dropped on so the fluid travels through the pigments under capillary action.

A little wet effects fluid added while the fixer is still wet, in the deeper recesses.


Under the sponsons the pigments were sprinkled on heavily before adding the fixer.
Cheers
JT
Here's a SBS I did today:
A slurry of pigment and white spirit brushed on.

When dry the pigments were moved around and feathered out in places.


Fixer, not brushed on but dropped on so the fluid travels through the pigments under capillary action.

A little wet effects fluid added while the fixer is still wet, in the deeper recesses.


Under the sponsons the pigments were sprinkled on heavily before adding the fixer.
Cheers
JT
John T- Platoon Commander

- Posts : 2767
Join date : 2010-11-09
Age : 60 Location : Townsville, Australia
 Re: JTs StuIG 33B
Thanks John, that is very helpful 
I'll need to stock up on AK Interactive products I think
Andrew
I'll need to stock up on AK Interactive products I think
Andrew
Andrew C- Be nice to me I am new

- Posts : 75
Join date : 2012-10-13
Age : 46 Location : Auckland, New Zealand
 Re: JTs StuIG 33B
Excellent work JT , love the SBS too 

 ! I can see we are going to need a high pressure washer to clean this beasty when it comes back from the field !
Jenny
Jenny
 Re: JTs StuIG 33B
Hiya JT:
Your StuIG is looking great. And thank you for that quick little SBS on working with the piggys
Gary

G Cooper- naughty corner commissar

- Posts : 3027
Join date : 2009-01-16
Age : 112 Location : Yuma, Az.
 Re: JTs StuIG 33B
Jenny, Gary, thanks for your great comments!
Cheers
JT
Cheers
JT
John T- Platoon Commander

- Posts : 2767
Join date : 2010-11-09
Age : 60 Location : Townsville, Australia
 Re: JTs StuIG 33B
Great progress John. I see a few pics on FB but now i save all trend to my HD. Waiting for next step.
Cheers.
Lechu.
Cheers.
Lechu.
 Re: JTs StuIG 33B
Thanks Lechu!
Here is the final in progress update. I made a tarp from teabag paper, glued to a sprue frame first.

Brushed on a heavy coat of undiluted Model Colour Field Grey.

When just dry the tarp is flexible as Vallejo paints are kind of rubbery. I put it in place and let it cure for a day. Then a coat of Lifecolor matt varnish and some highlights were painted on, then it was glued down with superglue.
Just some extra notes concerning pigments, I find it's best to 'fuss' with them before adding the fixer, just move them around and sprinkle more, 'set' them with white spirit first, and when happy add the fixer. Once you start trying to change things after the fixer is added, you can end up with a mess! I did this a few times which left me with too much fixer in places which left shiney areas. These were flattened with a final airbrushed coat of lifecolor Matt Varnish.
So now the model is virtually complete, I may just touch up a few small things but this is pretty much it.


Cheers
JT
Here is the final in progress update. I made a tarp from teabag paper, glued to a sprue frame first.

Brushed on a heavy coat of undiluted Model Colour Field Grey.

When just dry the tarp is flexible as Vallejo paints are kind of rubbery. I put it in place and let it cure for a day. Then a coat of Lifecolor matt varnish and some highlights were painted on, then it was glued down with superglue.
Just some extra notes concerning pigments, I find it's best to 'fuss' with them before adding the fixer, just move them around and sprinkle more, 'set' them with white spirit first, and when happy add the fixer. Once you start trying to change things after the fixer is added, you can end up with a mess! I did this a few times which left me with too much fixer in places which left shiney areas. These were flattened with a final airbrushed coat of lifecolor Matt Varnish.
So now the model is virtually complete, I may just touch up a few small things but this is pretty much it.


Cheers
JT
John T- Platoon Commander

- Posts : 2767
Join date : 2010-11-09
Age : 60 Location : Townsville, Australia
 Re: JTs StuIG 33B
Really nice work!!! 


Jack
Jack

CaptainJack- seasoned veteran

- Posts : 239
Join date : 2011-09-20
Age : 61 Location : USA
 Re: JTs StuIG 33B
Outstanding work JT. Thanks for the SBS on the mud and the tarp. I can't wait to get home and start building again. I'm going through plastic withdrawals. You and everyone else here on Jennys' Tanks & Things inspire me alot. Keep up the great work buddy. And watch out for Gary Cooper, I hear he's wearing a new cologne' called "Napalm in the morning". What with you having all that fur, could be hazardous to your health. Later tomater.
Last edited by tigertanktoo on Thu Mar 21, 2013 7:46 pm; edited 1 time in total (Reason for editing : fat fingers.)
 Re: JTs StuIG 33B
I had this mental image of a Monkey going to the kitchen and getting a tea bag and sitting down at the kitchen table , cutting the teabag with scissors  ! What a clever little monkey
 ! I reckon it looks awesome .
Jenny
Jenny
 Re: JTs StuIG 33B
Captain, many thanks buddy!
Thanks Chris! I'm pretty much out of reach of Gary's chain...here in my cage...(grins while picking up something from the floor, prepares to throw )
)
Thaaanks Jenny! I is handy with sharp instruments!!! Here..watch...oops
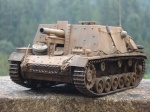
I'm glad you like the finished StuIG but I was pretty disappointed with the photos, so here are some new ones.


Thanks for looking! Cheers
JT


Thanks Chris! I'm pretty much out of reach of Gary's chain...here in my cage...(grins while picking up something from the floor, prepares to throw
Thaaanks Jenny! I is handy with sharp instruments!!! Here..watch...oops
I'm glad you like the finished StuIG but I was pretty disappointed with the photos, so here are some new ones.


Thanks for looking! Cheers
JT


John T- Platoon Commander

- Posts : 2767
Join date : 2010-11-09
Age : 60 Location : Townsville, Australia
 Re: JTs StuIG 33B
John, this is quite simply superb. Love the finish you've done on this kit and more so as as I know full well the hard work you've had to put in on the build thanks to Dragon's omissions and other surprises. Your description on finishing with pigments has been carefully noted and I really hope that by following what you've done I can get even a part way to making either one of my StuIGs looking as good as this.

Andy J- seasoned veteran

- Posts : 426
Join date : 2010-11-07
Age : 55 Location : Gunnislake, Cornwall
 Re: JTs StuIG 33B
Awesome work again Monkey Boy.  Not only have you come up with a great model but you’ve also provided us with a great lesson in weathering(and I need all the help I can get!).

John Short- seasoned veteran

- Posts : 349
Join date : 2009-02-23
Age : 55 Location : Brisbane, Queensland, Australia
Page 3 of 4 •  1, 2, 3, 4
Page 3 of 4
Permissions in this forum:
You cannot reply to topics in this forum