StuIG 33 - Kursk, 1943
+4
John T
S P Hammerton
Jenny Ryan
Andy J
8 posters
Page 3 of 3
Page 3 of 3 •  1, 2, 3
 Re: StuIG 33 - Kursk, 1943
hmgroth wrote:Neat job on the tracks!
Mark
Thanks Mark, they weren't as onerous as I thought they would be, or maybe the wine just dulled my senses sufficiently that I didn't notice.
Andy J- seasoned veteran

- Posts : 426
Join date : 2010-11-07
Age : 55 Location : Gunnislake, Cornwall
 Re: StuIG 33 - Kursk, 1943
Last update before xmas on this build as I have to prepare the sausage meat and chestnut stuffing and check the car out in preparation for its 500 mile round trip.
Anyway, today has been spent spray painting but before I start on that, today's health and safety tip is to make sure that all gas cylinder connections are fully done up before opening the valve. Once my heart rate returned to normal I went off to fetch my big adjustable and do exactly that

The hull has been coated in automotive white primer to tie in all the various materials into a uniform(ish) base coat that I can work from. The white also has the added benefit of highlighting any any areas that need rework with filling, clean up or tidying. I did however, forget to add the aerial before starting this, so that dark yellow had better bite into the brass

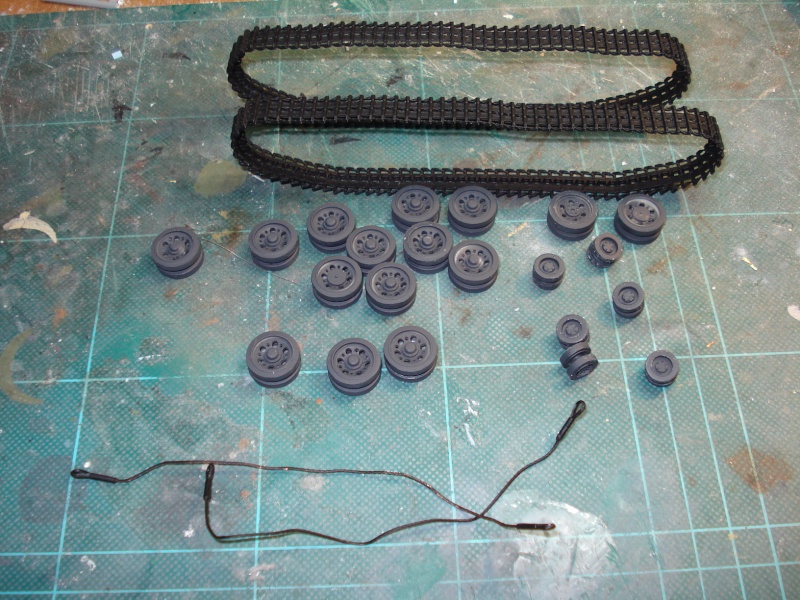
The tracks and tow cables were primed using black automotive primer, whilst the wheels were sprayed with Hannants Tyre Black. The tyre black is a pretty close match to panzer grey so I'm going to leave the backs of the wheels in that colour as I reckon they would have been left on when the vehicle was resprayed in Feb/March '43.
Anyway, today has been spent spray painting but before I start on that, today's health and safety tip is to make sure that all gas cylinder connections are fully done up before opening the valve. Once my heart rate returned to normal I went off to fetch my big adjustable and do exactly that

The hull has been coated in automotive white primer to tie in all the various materials into a uniform(ish) base coat that I can work from. The white also has the added benefit of highlighting any any areas that need rework with filling, clean up or tidying. I did however, forget to add the aerial before starting this, so that dark yellow had better bite into the brass


The tracks and tow cables were primed using black automotive primer, whilst the wheels were sprayed with Hannants Tyre Black. The tyre black is a pretty close match to panzer grey so I'm going to leave the backs of the wheels in that colour as I reckon they would have been left on when the vehicle was resprayed in Feb/March '43.


Andy J- seasoned veteran

- Posts : 426
Join date : 2010-11-07
Age : 55 Location : Gunnislake, Cornwall
 Re: StuIG 33 - Kursk, 1943
Hi Andy
Well done with those tracks! You're making great progress, looking forward to more.
Merry Christmas!
JT
Well done with those tracks! You're making great progress, looking forward to more.
Merry Christmas!
JT
John T- Platoon Commander

- Posts : 2767
Join date : 2010-11-09
Age : 60 Location : Townsville, Australia
 Re: StuIG 33 - Kursk, 1943
Hiya Andy:
Cool tip on the health bit. But what is that "saftey" thing
Anyways, your build is progressing well, and everything looks great so far. And I think the antenna should be in black and not the base yellow as the German antennas were easily removable and probably would not be left on when getting a repaint job. Especially at a rear area depot I would think. And your tracks , wheels, and tow cables all look good too.
Gary

G Cooper- naughty corner commissar

- Posts : 3027
Join date : 2009-01-16
Age : 112 Location : Yuma, Az.
 Re: StuIG 33 - Kursk, 1943
My StuIG 33 now has paint on it! Basecoat of dark yellow (White Ensign Models thinned with lacquer thinners) with most of the vehicle as one complete assembly as only the extras as separate items.

One problem with using the pale primer is that in places it acts as a counter-shade, luckily this time it will be obscured but note to self is that some pre-shading might be in order or using a darker primer next time.
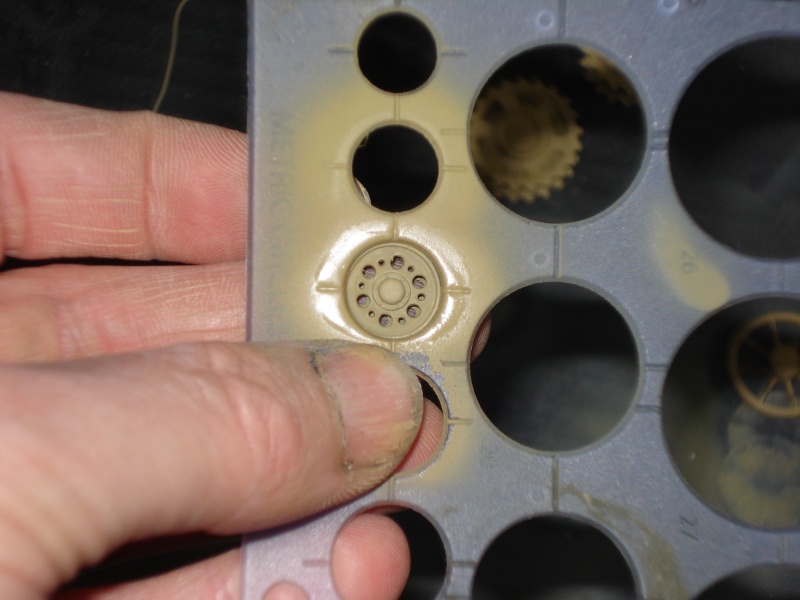
Instead of rushing out and buying an expensive wheel mask I use my circle template that I bought from WH Smiths for a couple of quid. So far it hasn't let me down and has always had the right size hole to mask the tyres allowing me to spray paint the wheel.
After really cocking up the first attempt at camouflage I had a bit more success the second time around. Both attempts were with WEM Olive green and Humbrol red/brown mixed with a bit of brick red and in each case thinned with lacquer thinners.

I was having real problems with remembering how to use my double action airbrush as it was so long since I last used it for fine work, kept on ending up with splatters and poor finish. Using lacquer thinners is tricky as well because the paint dries very quickly so again next time I'll use standard thinners until such time as I have got my "muscle memory" back again. However this time I got round the problem by using my single action airbrush and ensuring I set it up properly.

Next task is toning the colours down with a 50/50 mix of dark yellow and white applied as a very fine mist and then raiding the cleaning cupboard for the Future. Meh, who am I kidding, if I ever need to polish some floors I'll be raiding my modelling room for the stuff

One problem with using the pale primer is that in places it acts as a counter-shade, luckily this time it will be obscured but note to self is that some pre-shading might be in order or using a darker primer next time.
Instead of rushing out and buying an expensive wheel mask I use my circle template that I bought from WH Smiths for a couple of quid. So far it hasn't let me down and has always had the right size hole to mask the tyres allowing me to spray paint the wheel.

After really cocking up the first attempt at camouflage I had a bit more success the second time around. Both attempts were with WEM Olive green and Humbrol red/brown mixed with a bit of brick red and in each case thinned with lacquer thinners.

I was having real problems with remembering how to use my double action airbrush as it was so long since I last used it for fine work, kept on ending up with splatters and poor finish. Using lacquer thinners is tricky as well because the paint dries very quickly so again next time I'll use standard thinners until such time as I have got my "muscle memory" back again. However this time I got round the problem by using my single action airbrush and ensuring I set it up properly.

Next task is toning the colours down with a 50/50 mix of dark yellow and white applied as a very fine mist and then raiding the cleaning cupboard for the Future. Meh, who am I kidding, if I ever need to polish some floors I'll be raiding my modelling room for the stuff

Andy J- seasoned veteran

- Posts : 426
Join date : 2010-11-07
Age : 55 Location : Gunnislake, Cornwall
 Re: StuIG 33 - Kursk, 1943
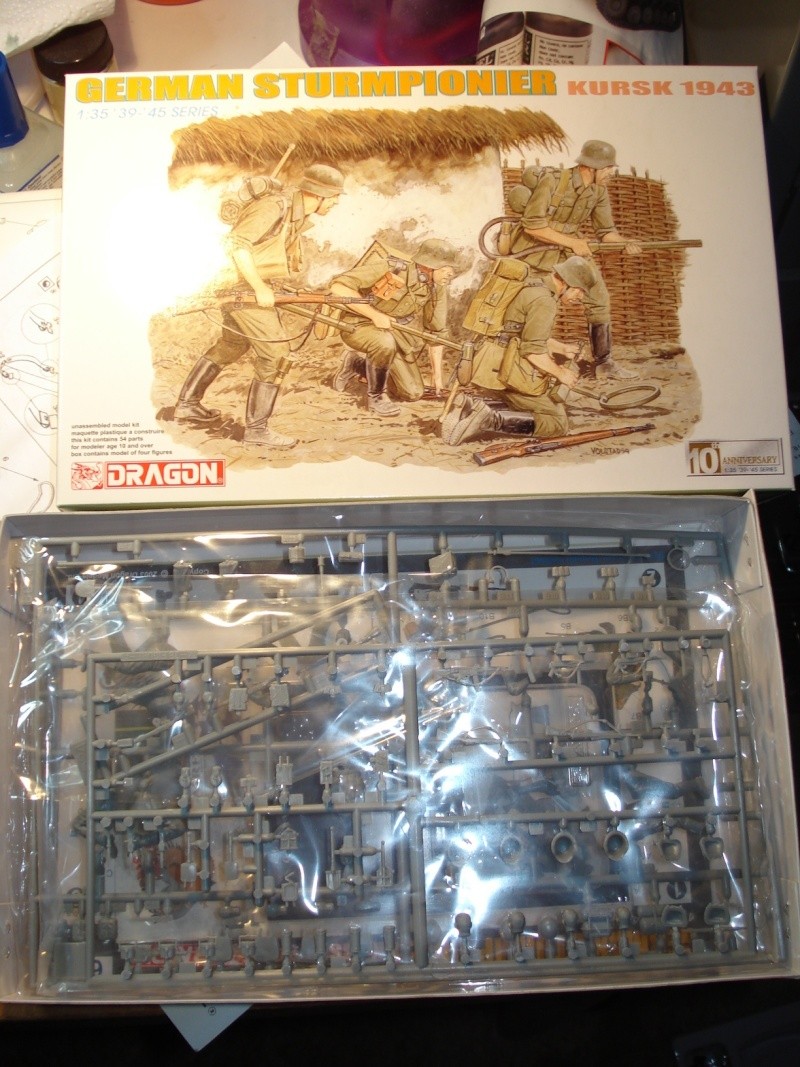
Some figures that will be part of a small diorama that I have planned for this build.


Andy J- seasoned veteran

- Posts : 426
Join date : 2010-11-07
Age : 55 Location : Gunnislake, Cornwall
 Re: StuIG 33 - Kursk, 1943
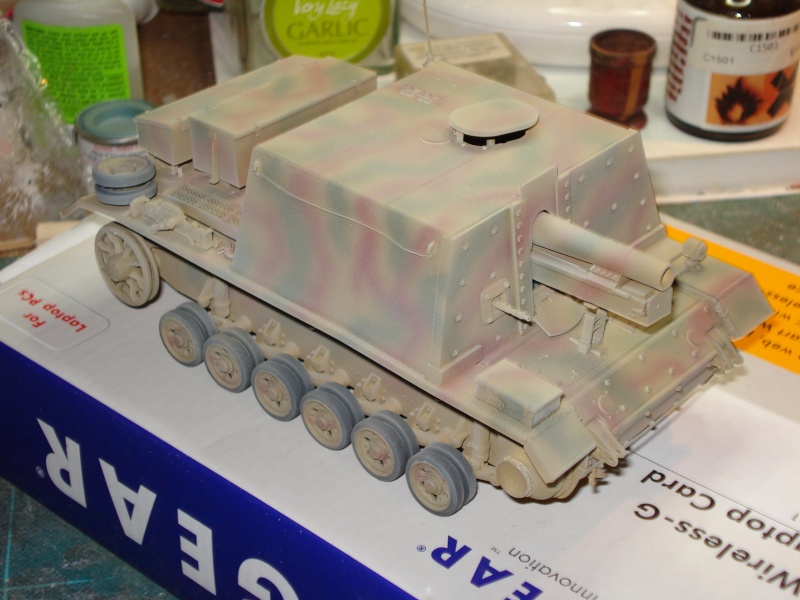
As I had plenty of 50:50 dark yellow/white filter left over from my Maus it would have been rude to not give the StuIG the same treatment.



Andy J- seasoned veteran

- Posts : 426
Join date : 2010-11-07
Age : 55 Location : Gunnislake, Cornwall
 Re: StuIG 33 - Kursk, 1943
Hi Andy:
That really looks great with the overspray to mute the colors. And I just LOVE the flamthrower guy
Gary

G Cooper- naughty corner commissar

- Posts : 3027
Join date : 2009-01-16
Age : 112 Location : Yuma, Az.
 Re: StuIG 33 - Kursk, 1943
Hi Andy, it's going well.
Cheers
JT
Cheers
JT
John T- Platoon Commander

- Posts : 2767
Join date : 2010-11-09
Age : 60 Location : Townsville, Australia
 Re: StuIG 33 - Kursk, 1943
Cheers guys.
It was the flamethrower guy who gave that spark of inspiration for the setting for the vehicle. The StuIG 33 would have been used to take out pillboxes and strong-points, it would figure that these attacks would be made in concert with sturmpionier, so there you have it. I just need to source a suitable strong-point for them to have assaulted.
Got the decals on today; as I have been basing this build on one vehicle which had been photographed several times and has some very distinctive features that meant this was always going to be gun G4. I used the decals provided in the Smart Kit as they're a lot better looking than the original ones and my other StuIG 33 is only going to need the crosses, which Dragon provide several options for anyway.
Same as I did with the Maus, a coat of Klear, apply the decal and use Mr Mark Softer to get it on and then Mr Mark Set to fix it in place. Followed up more Klear once they had set.
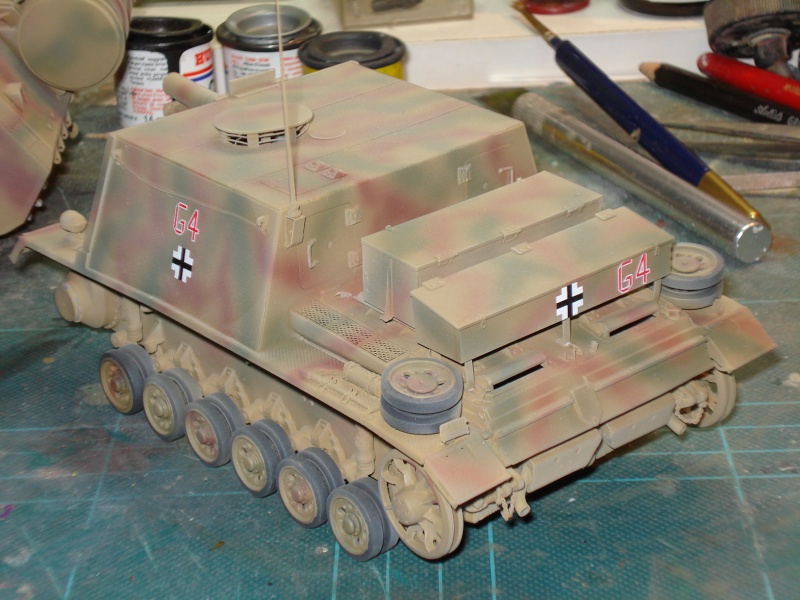
G4 is also the only vehicle that is clearly shown with the unit marking on the front right mudguard.
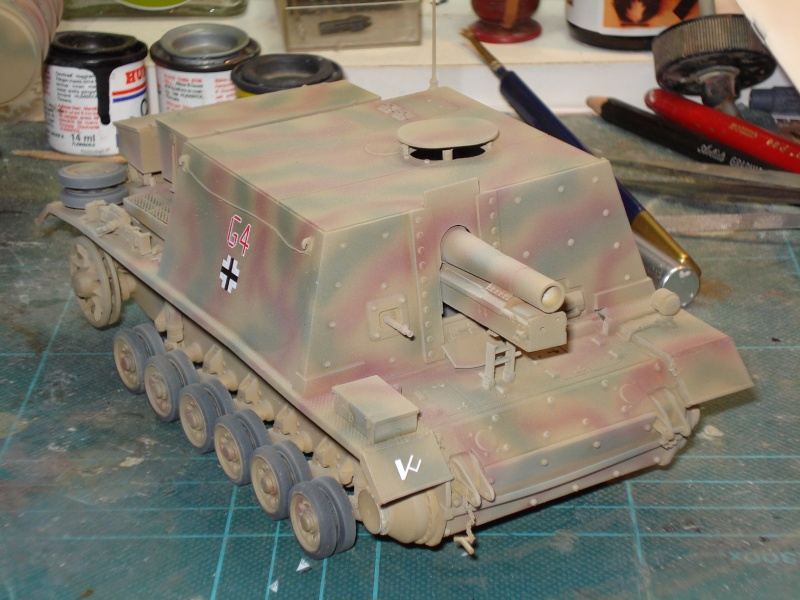
It was the flamethrower guy who gave that spark of inspiration for the setting for the vehicle. The StuIG 33 would have been used to take out pillboxes and strong-points, it would figure that these attacks would be made in concert with sturmpionier, so there you have it. I just need to source a suitable strong-point for them to have assaulted.
Got the decals on today; as I have been basing this build on one vehicle which had been photographed several times and has some very distinctive features that meant this was always going to be gun G4. I used the decals provided in the Smart Kit as they're a lot better looking than the original ones and my other StuIG 33 is only going to need the crosses, which Dragon provide several options for anyway.
Same as I did with the Maus, a coat of Klear, apply the decal and use Mr Mark Softer to get it on and then Mr Mark Set to fix it in place. Followed up more Klear once they had set.

G4 is also the only vehicle that is clearly shown with the unit marking on the front right mudguard.


Andy J- seasoned veteran

- Posts : 426
Join date : 2010-11-07
Age : 55 Location : Gunnislake, Cornwall
 Re: StuIG 33 - Kursk, 1943
Looking mighty fine so far  , it sounds like you using the future on the floor is like JT using hairspray for his hair

 , solely for model use only
  .
.
Now when you mention the flamethrower guy being inspiration , are you talking about Rons artwork or our very own pyromaniacs infinate words of wisdom ?
Jenny
 .
.Now when you mention the flamethrower guy being inspiration , are you talking about Rons artwork or our very own pyromaniacs infinate words of wisdom ?
Jenny
 Re: StuIG 33 - Kursk, 1943
Thanks Jenny 
Now 20 years ago I would have plenty of hairspray, back in the day when I sported a jet black deathhawk! Nowadays I go for a more natural look, so I'll be scrounging the hairspray from Annie for the other build.
Of course I was talking about Ron's artwork! Don't believe the rumours about school chemistry lessons being used to develop a formula for napalm
It was simply the poses of the figures, I could see them crowding round the vehicle after clearing one strongpoint and using it as cover as they clear the way to the next one, and then the one after that and the one behind that one and so on...
By the way any recommendations on wooden bunker type diorama accessories? I was sure Miniart did one but a check on their website is a negative.
Now 20 years ago I would have plenty of hairspray, back in the day when I sported a jet black deathhawk! Nowadays I go for a more natural look, so I'll be scrounging the hairspray from Annie for the other build.
Of course I was talking about Ron's artwork! Don't believe the rumours about school chemistry lessons being used to develop a formula for napalm

It was simply the poses of the figures, I could see them crowding round the vehicle after clearing one strongpoint and using it as cover as they clear the way to the next one, and then the one after that and the one behind that one and so on...
By the way any recommendations on wooden bunker type diorama accessories? I was sure Miniart did one but a check on their website is a negative.

Andy J- seasoned veteran

- Posts : 426
Join date : 2010-11-07
Age : 55 Location : Gunnislake, Cornwall
 Re: StuIG 33 - Kursk, 1943
Apologies for the hiatus in build updates on this StuIG, I've been desperately finding new employment after my previous company suddenly called in the administrators and stopped paying us. Luckily I now have new employment, which is now even further into Cornwall (St. Columb Major for those who know the area).
Well, with the panic over I now have time to myself and sat down to crack on with the Kursk StuIG. First up were the tracks to complete the running gear.
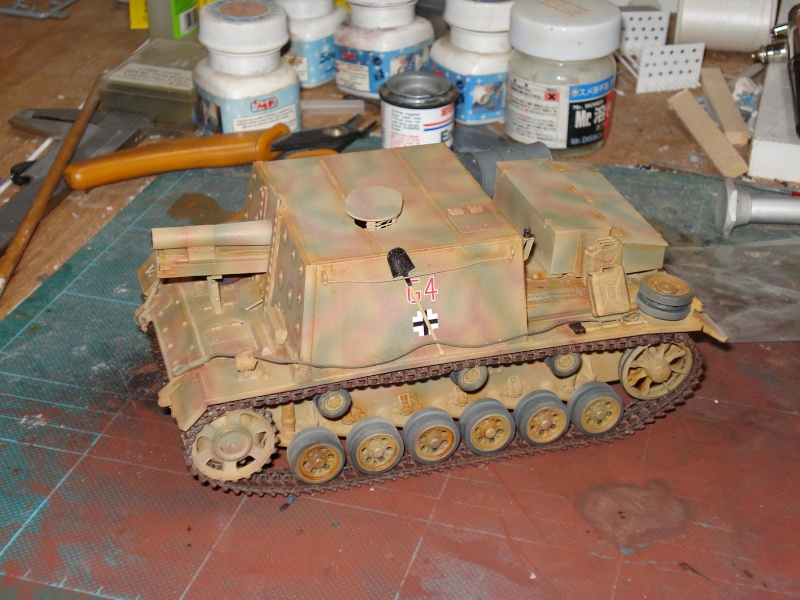
And the stowage particular to gun G4, annoyingly the pin wash appears to have spread out and formed an "eye" and didn't highlight the bolts, so that's a bit of remedial work for me later one.

With the StuIG nearly complete I have turned my eye to the setting, decided to use the ancient Italeri command post, that's been lurking in the stash for years, as a Soviet gun position housing a hastily abandoned F22 76.2 mm gun (Bronco), which has just been assaulted by the some Sturmpioneer supported by the StuIG. Quick layout idea is what I have in mind.
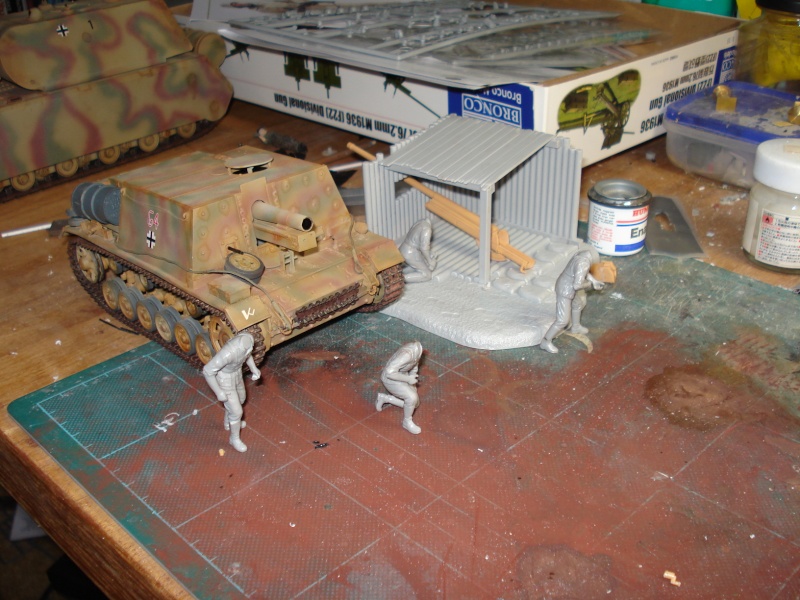
Well, with the panic over I now have time to myself and sat down to crack on with the Kursk StuIG. First up were the tracks to complete the running gear.

And the stowage particular to gun G4, annoyingly the pin wash appears to have spread out and formed an "eye" and didn't highlight the bolts, so that's a bit of remedial work for me later one.

With the StuIG nearly complete I have turned my eye to the setting, decided to use the ancient Italeri command post, that's been lurking in the stash for years, as a Soviet gun position housing a hastily abandoned F22 76.2 mm gun (Bronco), which has just been assaulted by the some Sturmpioneer supported by the StuIG. Quick layout idea is what I have in mind.


Andy J- seasoned veteran

- Posts : 426
Join date : 2010-11-07
Age : 55 Location : Gunnislake, Cornwall
 Re: StuIG 33 - Kursk, 1943
Looking good mate!
Sometimes a really matt surface can make pin washes misbehave; the micro roughness of the surface draws the paint out like a sponge. If it's an enamel or oil you may be able to clean it up with a brush damp with thinner. I get the same problem
Cheers
JT
Sometimes a really matt surface can make pin washes misbehave; the micro roughness of the surface draws the paint out like a sponge. If it's an enamel or oil you may be able to clean it up with a brush damp with thinner. I get the same problem
Cheers
JT
John T- Platoon Commander

- Posts : 2767
Join date : 2010-11-09
Age : 60 Location : Townsville, Australia
 Re: StuIG 33 - Kursk, 1943
Hi Andy
This is progressing well, totally echo JT's comments regarding washes over different surfaces.
Gunnislake to St Columb is a bit of a schlep, ah well it's a job.
Simon
This is progressing well, totally echo JT's comments regarding washes over different surfaces.
Gunnislake to St Columb is a bit of a schlep, ah well it's a job.
Simon
 Re: StuIG 33 - Kursk, 1943
Thanks chaps
Hopefully I can recover the situation with the pin wash, might have to be a bit creative of course. Next build will have more Future on it to smooth the surface down a bit more, which should help the pin washes behave.
The trek isn't too bad at the moment, but it does eat into my building time a lot as it takes about 50 minutes if the A30 is clear. Not looking forward to the Grockles appearing though as I think that will slow things down a lot. Planning to be moved before the winter so I won't have to use the B-road short cut from Callington to the A30 in the dark, which won't be fun.

Andy J- seasoned veteran

- Posts : 426
Join date : 2010-11-07
Age : 55 Location : Gunnislake, Cornwall
 Re: StuIG 33 - Kursk, 1943
Where were you thinking of moving to?
Go West young man, so you can fall into the clutches of the Cornish Scale Modellers.
Simon
Go West young man, so you can fall into the clutches of the Cornish Scale Modellers.
Simon
 Re: StuIG 33 - Kursk, 1943
Finished! Or at least 99% done anyway. I may well redo some of the weathering as I think I might have been a bit heavy handed in places. Also if I get time this month I'll place it on a base and add a figure.
Photos were taken in my garden overlooking the Tamar valley, the conifer woodland standing in for Soviet Russia. If I can find it I'll use my white photobox to take some close up pics.
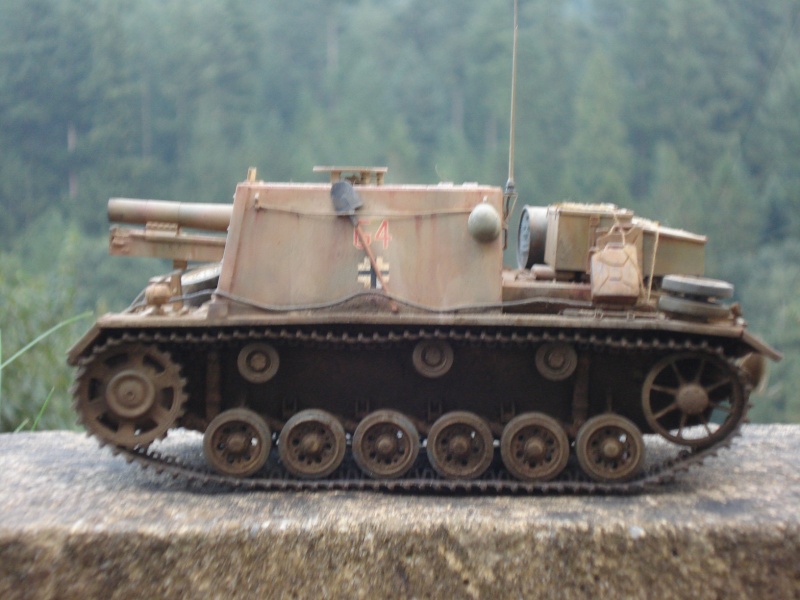
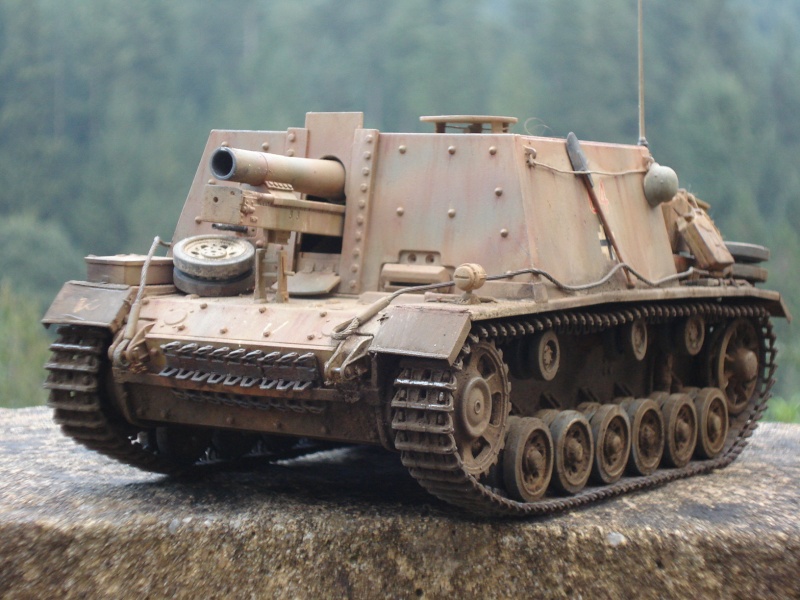


Photos were taken in my garden overlooking the Tamar valley, the conifer woodland standing in for Soviet Russia. If I can find it I'll use my white photobox to take some close up pics.


Andy J- seasoned veteran

- Posts : 426
Join date : 2010-11-07
Age : 55 Location : Gunnislake, Cornwall
 Re: StuIG 33 - Kursk, 1943
Hi Andy:
You have got a great looking StuG there. Personally I like the weathering just the way it is now. It looks very realistic to me, and I think that most modellers really do not do enough as far as being realistic. Real vehicles get really dusty really fast, and the Germans didn't get to go back to base and go to the wash rack during WWII
Gary

G Cooper- naughty corner commissar

- Posts : 3027
Join date : 2009-01-16
Age : 112 Location : Yuma, Az.
 Re: StuIG 33 - Kursk, 1943
Nice job Andy and the photos look great.

John Short- seasoned veteran

- Posts : 349
Join date : 2009-02-23
Age : 55 Location : Brisbane, Queensland, Australia
 Re: StuIG 33 - Kursk, 1943
Thanks chaps 
I revisited some of the dust on the spare wheels and the tarp, but only to tie it in better. Might add some scratches but really to be honest, I think I'm going to add this one to the display cabinet and leave space on the work bench for the Shermans.
I revisited some of the dust on the spare wheels and the tarp, but only to tie it in better. Might add some scratches but really to be honest, I think I'm going to add this one to the display cabinet and leave space on the work bench for the Shermans.

Andy J- seasoned veteran

- Posts : 426
Join date : 2010-11-07
Age : 55 Location : Gunnislake, Cornwall
Page 3 of 3 •  1, 2, 3
 Similar topics
» JTs StuIG 33B
» Andy's other StuIG 33
» Another StuIG 33B from Dragon!
» New from Dragon
» Pz IV G April-May 1943
» Andy's other StuIG 33
» Another StuIG 33B from Dragon!
» New from Dragon
» Pz IV G April-May 1943
Page 3 of 3
Permissions in this forum:
You cannot reply to topics in this forum